
Jacksboro appointments begin with your installer assessing the space, performing an accurate load calculation and proper unit sizing, and explaining the timeline and costs so you know what to expect; the crew will complete ductwork, hookups, and an electrical and gas-line safety check with carbon monoxide testing to address any hazards, and you’ll receive documentation from licensed, insured technicians with manufacturer warranty details before they leave.
Key Takeaways:
- Technician arrival and pre-install inspection: expect an arrival window, a walkthrough to assess the old unit, ductwork, gas/electrical hookups and any local permit or code requirements for Jacksboro, TN.
- Heater Installation process and timing: removal of the old heater, placement and connection of the new unit, venting/electrical/gas hookups, safety and carbon-monoxide tests, thermostat setup and a full system test – typically 2-6 hours depending on complexity.
- Homeowner prep and post-install steps: provide clear access and secure pets, have necessary paperwork/payment ready; final walkthrough will cover operation, warranty info and recommended maintenance.
Overview of Heater Installation
During your appointment, technicians typically complete a full site assessment, system sizing, and the physical install in about 2-6 hours for standard furnaces or up to a day for complex jobs. You’ll get permit checks, safety gas/electrical connections, and a startup test; any venting or electrical upgrades are noted and quoted. Expect clear documentation of warranty activation and a final safety checklist before the crew leaves.
Importance of Professional Installation
You want certified pros because improper work can cut system efficiency by up to 20-30%, void manufacturer warranty, and create safety hazards like carbon monoxide leaks or electrical faults. Technicians ensure correct vent sizing, refrigerant charge, and combustion tuning, and they file permits when required, protecting your investment and household health.
Common Types of Heaters Installed
Most installs in Jacksboro involve gas furnaces (15-20 year life), heat pumps (COP 2-3, efficient in mild winters), electric furnaces, ductless mini-splits, and boilers. Each type has distinct venting, electrical, and space requirements you’ll need to address during the appointment to ensure optimal performance and compliance with codes.
- Gas furnace – high-output heating, requires proper flue and combustion air.
- Heat pump – can deliver 200-300% energy transfer in warm conditions.
- Mini-split – ideal for additions, avoids duct losses of ~20%.
- Boiler – provides hydronic comfort, needs water treatment and pressure checks.
- This installation choice affects permit scope, timeline, and final efficiency.
| Gas Furnace | Typical install 3-6 hrs; requires vent/combustion checks; lifetime 15-20 yrs |
| Heat Pump | Often needs 1-2 ton sizing; COP 2-3; may need supplemental heat below 30°F |
| Electric Furnace | Simple install but higher operating costs; check panel capacity |
| Ductless Mini-Split | 4-8 hr install per zone; minimal ductwork; efficient for remodels |
| Boiler | Requires piping, expansion tank, and water treatment; lifespan 15-30 yrs |
For more detail, you’ll see that gas furnaces need sealed combustion and carbon monoxide testing, while heat pumps may require a defrost strategy and backup heat in cold snaps; mini-splits need precise indoor unit placement to avoid short-cycling. Typical labor for a full changeout ranges from 4-8 hours for single-zone systems to a full day for multi-zone or structural modifications.
- Venting needs – gas systems demand correct flue and draft.
- Electrical upgrades – heat pumps or electric furnaces often need larger breakers.
- Refrigerant charge – necessary for heat pump efficiency and warranty compliance.
- Ductwork – sealing and balancing can improve system output by ~10-20%.
- This installation checklist guides permit filing, safety testing, and warranty setup.
| Venting & Combustion | CO testing, sealed combustion where applicable; code compliance required |
| Electrical | Panel capacity check, dedicated breakers, 240V for some systems |
| Refrigerant | Charge verification with gauges; leak check to protect performance |
| Ductwork | Leak sealing, insulation, and proper sizing to reduce losses |
| Permits & Docs | Permits pulled as needed; warranty registration and startup report provided |
Pre-Installation Preparations
Home Assessment and Measurements
During the home assessment your installer will measure square footage, ceiling heights, attic and wall R-values, window types and orientation, and inspect ductwork for leaks and sizing; they typically perform a Manual J load calculation, which for a 1,500 sq ft home often yields a 30,000-45,000 BTU requirement. They’ll also check electrical service and gas piping capacity and note required clearances; these checks usually take 30-60 minutes for a standard single-family home.
Choosing the Right Heater
You’ll review fuel and equipment options-gas furnaces (AFUE 80-98%), heat pumps (HSPF 8-13+ for cold-climate models), or electric furnaces-and match capacity to the Manual J result; for example, a 1,500 sq ft home in Jacksboro often pairs with a 2.5-3.5 ton (30,000-42,000 BTU) heat pump or a comparable gas furnace. Efficiency ratings, installation complexity, and incentives factor into the final recommendation.
Sizing matters: oversizing causes short-cycling, more wear, and higher bills, while undersizing produces inadequate heating</strong). Your installer will verify duct compatibility, venting for combustion appliances, and whether your electrical panel needs an upgrade (many modern heat pumps require a dedicated 30-60 amp circuit). Warranties and manufacturer-matched components are emphasized to protect performance and long-term savings.
What to Expect on Installation Day
Expect a focused, scheduled visit where a crew of 2-3 technicians follows a checklist: verify permits, protect floors with tarps, disconnect the old unit, and install the new system. Typical installs in Jacksboro take about 3-6 hours, though complex ductwork or code fixes can extend that. You’ll see baseline measurements, safety shutoffs tested, and final system startup with paperwork and warranty registration completed before the crew leaves.
Arrival of the Installation Team
Technicians usually arrive within your agreed window (commonly 8-11 AM); they’ll present ID, wear shoe covers, and stage tools. A lead tech will walk your home with you, confirm work scope, note access to the utility panel, and point out any immediate hazards like a blocked flue or exposed wiring. If you have pets or mobility concerns, tell them when they arrive so they can adapt the workflow.
Initial Assessment and Setup
At setup, the team performs a rapid site audit: measure airflow and static pressure, inspect ducts and vents, and check gas and electrical connections using a manometer and multimeter. They target ~400 CFM per ton of airflow and static pressure below 0.5 in. w.c., and confirm manifold pressure (about 3.5 in. w.c. for natural gas) before proceeding. Any gas leak or live electrical conductors found will halt work immediately.
Technicians then document conditions with photos and a 10-point checklist, run a combustion analysis with a gas analyzer, and verify thermostat calibration within ±1°F. You’ll see condensate routing, electrical connections tightened, and venting checks completed; the crew typically demonstrates system controls, logs serial numbers for warranty, and leaves a copy of safety and test readings for your records.
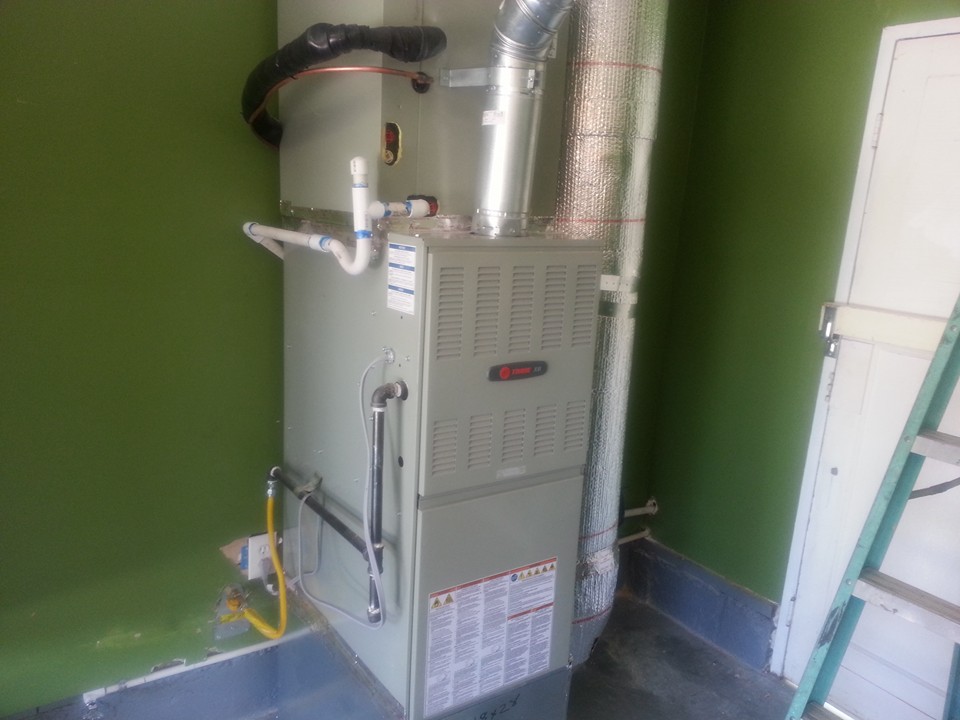
The Installation Process
Technicians typically complete a full install in about 3-6 hours with a two-person crew, handling permits, duct checks, and disposal of the old unit. You’ll see a step-by-step workflow: disconnect utilities, remove the old system, set and level the new heater, connect gas/electric and venting, then run performance and safety tests. Expect documentation of AFUE, warranty registration, and a final walkthrough showing you controls and maintenance tips.
Removal of Old Heater
Your crew will first shut off power and gas, vent the system, and disconnect controls; removal often takes 30-90 minutes depending on mounting and weight. If the unit contains hazardous materials (older insulation or components), they’ll note it and follow proper handling. Technicians will also cap lines, seal openings, and haul away the old heater for disposal or recycling while you watch for any signs of structural or duct damage.
Installation Steps for New Heater
Installers position and level the new furnace, connect the gas line and electrical supply, seal and modify ducts as needed, install venting or condensate lines, and wire the thermostat. They perform a combustion and gas-leak test, verify airflow (CFM), and run startup cycles to confirm proper operation and efficiency ratings like AFUE. Final steps include code-focused inspections and customer orientation.
More specifically, your technician will confirm sizing via a Manual J heat-load calculation before hookup, select a unit often rated between 40,000-120,000 BTU for typical homes, and adjust blower speed to achieve target CFM. They’ll also perform a draft test, measure flue temperatures, and log system pressures and voltages; any deviations trigger immediate correction so your heater meets safety standards and the manufacturer’s warranty requirements.
Post-Installation Procedures
After the unit is set, the crew will clean the area, remove old equipment, and complete final paperwork including permit labels and warranty forms. They’ll schedule a local code inspection if required-often within 7-10 days-and confirm system commissioning. You should receive clear documentation of work performed, serial numbers, and service contact information; any gas or electrical concerns discovered are isolated and labeled before technicians depart.
Testing the New Heater
Technicians will run the heater for 15-30 minutes to verify startup, airflow, and thermostat response. They’ll measure temperature rise (commonly 30-50°F for many furnaces), check for leaks with a soap or electronic detector, and read carbon monoxide levels-startup should typically be under 35 ppm with long-term exposure limits near 9 ppm. You’ll be shown test results and any adjustments made.
Customer Walkthrough and Instructions
You’ll get a hands-on walkthrough covering thermostat programming, filter type and location, circuit shutoff, and the recommended maintenance schedule-filters usually need replacing every 30-90 days, with an annual service visit suggested. Technicians will activate warranties and explain billing or rebate paperwork so you know when to expect energy savings and next service dates.
During the walkthrough they’ll identify the correct filter MERV rating (often MERV 8-11), demonstrate how to change it, and show how to run a manual heat call from your thermostat. Watch for warning signs they point out-odd noises, cycling less than 5 minutes, higher-than-expected bills-and if you ever smell gas, shut off the supply and call emergency services immediately. Documentation will list who to call for routine service and emergency response.
Maintenance Tips for Longevity
To maximize the life of your heater, change disposable filters every 1-3 months, keep vents clear of obstructions, and schedule an annual tune-up before cold weather. You should track energy bills for sudden spikes-efficiency drops of >10% often indicate issues-and keep a working carbon monoxide detector within 10 feet of sleeping areas. Any unusual odors, persistent pilot outages, or a yellow flame require immediate professional inspection.
- heater maintenance
- filter replacement
- annual tune-up
- professional inspection
Regular Maintenance Schedule
You should replace disposable filters every 1-3 months and clean washable filters monthly during heavy use; plan a licensed technician visit once a year for combustion analysis, safety checks, and a 20-point inspection. Seasonal prep in September or October prevents cold‑season failures, and swapping thermostat batteries every 6-12 months keeps controls reliable. Following this schedule typically maintains >90% seasonal efficiency and helps preserve any manufacturer or installer warranty.
Signs Your Heater Needs Service
Pay attention to loud banging, frequent short cycling, uneven heating, or unexplained bill increases of 10-15%; these often signal airflow, ignition, or heat‑exchanger problems. Detecting a yellow flame, soot, strange odors, or carbon monoxide alarm activation are safety hazards that require you to shut the unit off and call a technician immediately. Prompt action prevents more expensive failures and reduces safety risks.
When you notice service signs, document symptoms (times, sounds, thermostat settings) and photograph any visible damage or error codes; this speeds diagnosis. Typical repairs in Jacksboro are resolved within 1-4 hours for common issues like sensor replacement or ignition fixes, with parts and labor often ranging from roughly $150-$600 depending on the problem. If a heat exchanger shows cracks or corrosion, prioritize replacement-it’s a safety and longevity decision rather than a quick repair.
To wrap up
A heater installation appointment in Jacksboro, TN should be clear, professional, and safety focused from start to finish. Homeowners should expect proper system sizing, code compliant installation, thorough testing, and complete documentation. When installation is done correctly, your heater operates efficiently, heats evenly, and protects your home from risks such as carbon monoxide exposure or electrical issues.
That is the standard approach at ThermoSTAT Heating & Cooling.
Our licensed and insured technicians follow a detailed installation process that includes Manual J load calculations, proper venting and electrical checks, carbon monoxide testing, and full system commissioning. We take the time to explain the work being done, review operating instructions with you, and provide warranty and permit documentation before we leave. Clean workmanship and clear communication are part of every installation.
If you are considering a heater installation or replacement in Jacksboro, TN, choose a local HVAC company that prioritizes safety, accuracy, and long term performance.
Contact ThermoSTAT Heating & Cooling today to schedule your heater installation estimate and enjoy reliable comfort, professional service, and confidence in your new heating system all winter long.